Set Up Decoration Strips
In the kitchen planner, wall cabinets can be enhanced with a decoration strip. The "deco strip" option is editable by the customer in the Edit panel.
❗️ Even if there is no dependency with the bottom and side cover panels and the worktop light of the wall cabinet, the deco strip strongly links to these two options.
➡️️ Click here 🔗 to open the complete sample to define deco strips through API.
Definitions
The table below lists all the definitions around decoration strips.
| Term | Definition |
|---|---|
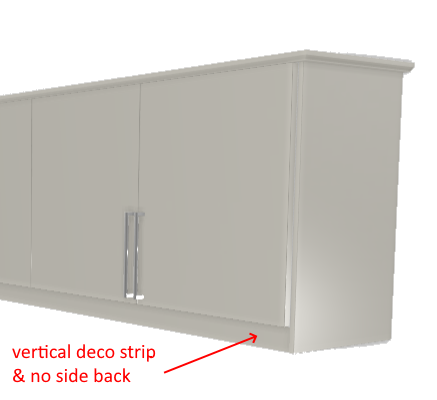
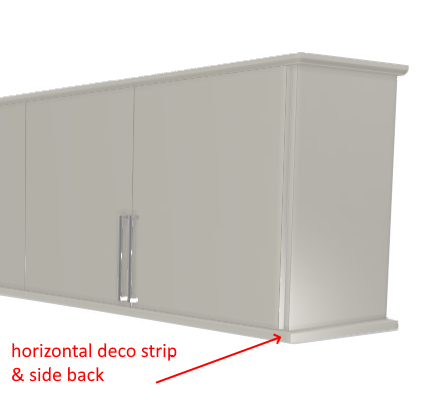
| Deco strip | A decoration strip is a linear that can be added under the wall cabinet on the front and/or on left and right sides. This strip can have different colors and shapes provided by dedicated products of the catalog. As a linear feature, deco strips of adjacent cabinets are merging if they are aligned and are generated from the narrow bottom path. |
| Deco strip section | Dedicated product which contain the parametric cross section to be used on horizontal or vertical orientation. This section is used to generate deco strip through a path via a sweep function. |
| Narrow bottom path | Defines in the .BMA of the box the front boundaries of the wall cabinet to provide the start and end points (at least) of the linear and its direction and position. |
| outer top path | Defines in the .BMA of the box the back boundaries of the wall cabinet to provide the start and end points (at least) of the linear and its direction and position. |
Illustrations
Below are illustrations of concepts regarding decorative strips that are documented hereinafter.
Vertical deco strip
Horizontal deco strip
Specify the Basic Information
The minimum information required to create a decoration strip is common to every kind of products.
This is:
- The name: The name will be displayed in the planner (in the Edit panel) and should be available for all languages. If not, the planner will display the name in the fallback language.
- Mandatory information: The product reference, the brand and the product type.
- Product information: This information is not mandatory but highly recommended, especially the short and long descriptions that are displayed in the planner.
- Product representation: This is where you specify among others the 3D resource, the thumbnail and the parameters.
- Pricing: This is where you specify the pricing type (regular, discount...).
❗️ Select your product type carefully because it will trigger the applicative rules: deco strips.
Specify the 3D Resource and the Thumbnail
The required resource for a decoration strip is a .BMA file that defines the section(s) to be used among other components (see hereinafter).
Click Upload a 3D model to browse for your .BMA file and add it to the datasheet.
📌 There is no preview to display in this area because the 3D resource is not a texture, unlike to other linears and the BMA of a deco strip is only the definition of the section of the strip, i.e. a set of points.
In addition, a texture (.BM3MAT file) is needed as a material parameter of the deco strip product; this material must be available in the current catalog (see below Define the material).
In some use cases, one second .BMA resource might be needed to define the cross section itself in a dedicated product ( see below Define the section product).
Specify the Dimension Parameters
Dimension parameters are always mandatory, specifically the width that is used to calculate the price.
| Parameter | Type | Possible values | Default value |
|---|---|---|---|
width | Continuous length | [0 ;∞] | 0 ≤ 2210 ≤ ∞ |
depth | Discrete length | [0 ;∞] | 20 |
height | Discrete length | [0 ;∞] | 60 |
The ecoFeeCategory Parameter
ecoFeeCategory has a usage:
- Define to find the same category in the range where the weight of the board lies and to retrieve the ecofee value of that weight.
❗️ This parameter is mandatory to trigger
EcoFeeRule.
| Parameter | Type | Possible values |
|---|---|---|
ecoFeeCategory | string | any string |
The linearWeight Parameter
linearWeight has a usage:
- Define to calculate the weight of linear using length and linearWeight and the calculated weight will be returned
by
EcoFeeRule.
❗️ This parameter is mandatory to trigger
EcoFeeRule. PreciselylinearWeightshould be in kilograms per meter.
| Parameter | Type | Possible values |
|---|---|---|
linearWeight | number | [0 ;∞] |
Define the Material
Click Add material replacement to set the material parameter.
| Parameter | Type | Possible values |
|---|---|---|
material | Material variation | External dbID |
The material parameter defines the texture to apply on the generated deco strip. This material must be available in
the standard material 🔗 library.
Define the Section Products
Decoration strips can be used vertically or horizontally (see the illustrations above).
That is why two product variations must be defined:
decostripHorizontalSectionto define the cross section, i.e. the shape of the strip when placed horizontally under the wall cabinet;decostripVerticalSectionto define the cross section, i.e. the shape of the strip when placed vertically back from the front.
Both parameters link to products that must be available in the catalog of the Legal Entity.
| Parameter | Type | Possible values | Default value |
|---|---|---|---|
decostripHorizontalSection | Product variation | External dbID | External dbID |
decostripVerticalSection | Product variation | External dbID | External dbID |
About Section Products
The products linked to the deco strip via the decostripHorizontalSection and decostripVerticalSection parameters
should have the following:
- The product type "Accessories": indeed, sections do not need a specific type because they are pointed by their ID;
- The dimension parameters specified both in their datasheet and in their .BMA;
- The BMA as 3D resource 🔗 because a section is defined by an output set.
Pricing
Like every product, wall edge strips support different pricing 🔗 types: regular, reduced, membership, etc.
Parameters to Add at Upper Level
Deco strip option is an indirect product feature. This means that it is not mandatory to list the deco strip products at the top-assembly level.
However, some settings have to be made at cabinet level:
- Enable the deco strip option;
- Enable the extension of the deco strip to the sides;
- Enable the modification of the orientation of the deco strip.
Enable the Deco Strip Option
Setting the decoStripOption to 'true' in the top-assembly (cabinet) datasheet will enable a choice of deco strips in
the planner corresponding to products available in the catalog.
Enable the Extension to the Sides
To allow the customer to enable or disable the extension of the deco strip on the left and/or right sides of the cabinet, two others parameters are needed on cabinet level:
- Define
leftDecoStripBackwith 'true' as default value; - Define
rightDecoStripBackwith 'true' as default value.
📌 Because these parameters will impact the size and the position of the panel, it is also necessary to overload the values at cabinet level with the values of the panel sub-assembly as an input value.
Enable the Modification of the Orientation
To allow the customer to change the orientation of the deco strip (either vertical or horizontal), the
parameter sectionOrientation is required at cabinet level.
📌 Because this parameter will impact the size and the position of the panel, it is also necessary to overload values from the cabinet level to the panels sub assembly as an input value.
Compatibility with Other Products
In some cases, you might have an incompatibility between worktop light and side deco strip.
Indeed, when the worktop light width equals the cabinet width, it is impossible to mount side deco strips.
In those cases, we suggest to use a product rule to manage that incompatibility.
- Go to Product rules in the menu. Then, click Add rule.
- Enter a name for the rule.
- Choose Parameter compatibility rule in the Type drop-down list.
- Submit
- Click Parameters to specify the parameters that will be involved by the rule: a. Enter worktopLight with the type product. b. Enter leftDecoStripBack with the type boolean. c. Enter righttDecoStripBack with the type boolean.
- Click Submit at the bottom of the page.
📌 The parameters are now the column headers.
- Click New compatibility set to enter data in the table.
- Click + in the worktopLight column to search for the wall cabinets concerned by the incompatibility.
- Click any in the leftDecoStripBack column to choose between True / False / any.
- Click any in the rightDecoStripBack column to choose between True / False / any.
- Click Submit.
📌 Add as many lines as products that are concerned by the rule by clicking New rule.