Set Up Risers
In the kitchen planner, wall and high cabinets can be enhanced with a riser. The riser option is editable by the customer in the Edit panel.
❗️ Even if there is no dependency with the top cover panel and the top light of the cabinet, the riser strongly links to these two options.
As any product, risers need be to defined in 3DCloud or via the API. The purpose of this page is to explain how to set up and position a riser on a base cabinet using 3DCloud.
➡️️ Click here 🔗 to open the complete sample to define risers through API.
Definitions
| Term | Definition |
|---|---|
| Riser | Riser is the panel that covers the area between the top of the wall/high cabinet and the kitchen ceiling. Risers are generated automatically as a linear feature of the kitchen planner. They are not set by default |
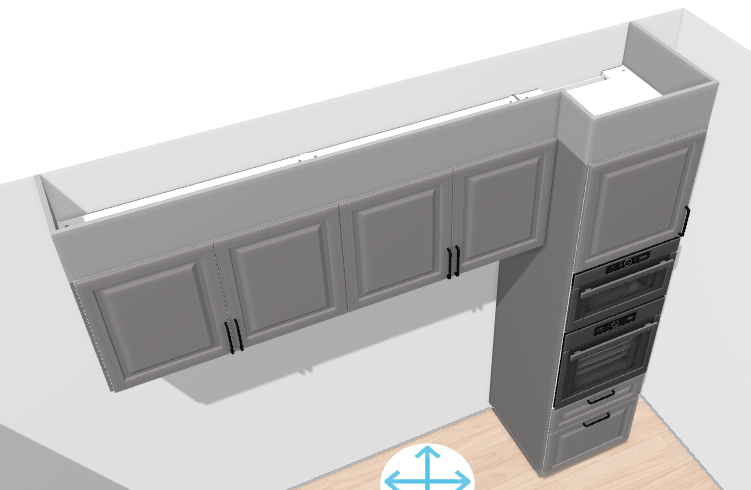
Illustrations
Below is an illustration of a riser on two wall cabinets adjacent with a high cabinet.
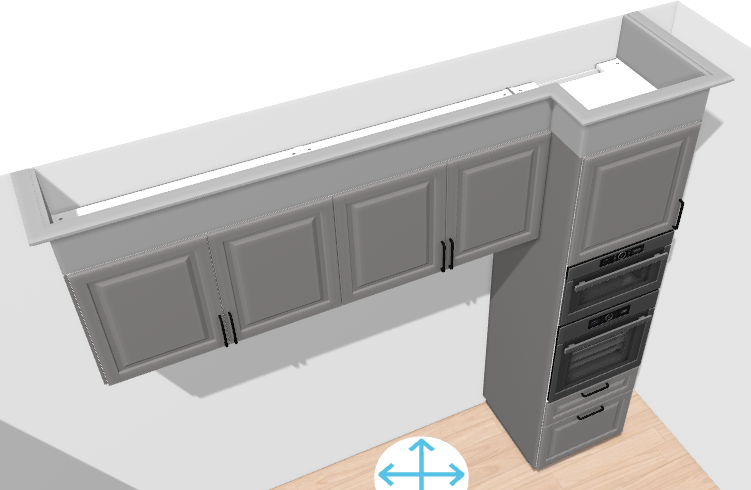
Below is the same as before with a cornice.
In this case, the cornice is placed on top of the riser, and the height of contact between the riser and the cornice is
defined in the cornice parameters
as heightRiserBinding parameter 🔗
Specify the Basic Information
The minimum information required to create a riser is common to every kind of products.
This is:
- The name: The name will be displayed in the planner (in the Edit panel) and should be available for all languages. If not, the planner will display the name in the fallback language.
- Mandatory information: The product reference, the brand and the product type.
- Product information: This information is not mandatory but highly recommended, especially the short and long descriptions that are displayed in the planner.
- Product representation: This is where you specify among others the 3D resource, the thumbnail and the parameters.
- Pricing: This is where you specify the pricing type, only on non generic products (regular, discount...).
❗️ Select your product type carefully because it will trigger the applicative rules: the type is "Risers".
❗️ Generic riser product. The riser must be defined as generic product (with no price) with a list of mapped products (with a price defined). If the riser is defined as generic product, all parameters in this document must be set on the generic riser product. The mandatory parameters required in the mapped products are the dimension parameters : width, depth, height (see dimension parameters 🔗 for more details).
Specify the 3D Resource and the Thumbnail
There is no required 3D resource for risers. However, a texture (.BM3MAT file) is needed as a material parameter of the riser generic product. This material must be available in the current catalog (see below Define the material).
- Click
 to specify the bitmap file that will be used as thumbnail in 3DCloud and in the planner.
Follow the format and size recommendations.
to specify the bitmap file that will be used as thumbnail in 3DCloud and in the planner.
Follow the format and size recommendations.
Specify the Dimension Parameters
❗️ The default sizes of the riser must be specified in the datasheet. Indeed, size parameters are mandatory, including for risers.
Click create parameter in the Parameter panel to define the default width, depth and height of the riser.
| Parameter | Parameter type | Default value | Possible values |
|---|---|---|---|
width | Discrete length | – | [0 ;∞] |
depth | Discrete length | – | [0 ;∞] |
height | Discrete length | – | [0 ;∞] |
❗️ The
heightof the riser generic product must be the maximum possible height for this riser. Theheightof the riser priced products must be different for each mapped product of a generic riser. For example, if a riser is available in 300mm and 500mm height, a generic riser product must be created with aheightof 500 (max available), and 2 priced products must be added in its mapping, with heights of 300 and 500.widthis a strictly mandatory parameter used for price calculation.

Define the Option Parameter
The ecoFeeCategory Parameter
ecoFeeCategory has a usage:
- Define to find the same category in the range where the weight of the board lies and to retrieve the ecofee value of that weight.
❗️ This parameter is mandatory to trigger
EcoFeeRule.
| Parameter | Type | Possible values |
|---|---|---|
ecoFeeCategory | string | any string |
The linearWeight Parameter
linearWeight has a usage:
- Define to calculate the weight of linear using length and linearWeight and the calculated weight will be returned
by
EcoFeeRule.
❗️ This parameter is mandatory to trigger
EcoFeeRule. PreciselylinearWeightshould be in kilograms per meter.
| Parameter | Type | Possible values |
|---|---|---|
linearWeight | number | [0 ;∞] |
Define the Material
Click Add material replacement to set the material parameter.
| Parameter | Type | Possible values | Default value |
|---|---|---|---|
material | Material | external dbID | external dbID |
The material parameter defines the texture to apply on the generated riser. This material must be available in the
standard material 🔗 library.
Calculation of the Riser Length
The length of the riser is based on the width dimension: this parameter is essential because risers are linear
products and not priced by the unit. In the case of a linear combination of several cabinets, risers are generated
automatically along the whole cabinets. The pricing depends on the total width of this linear.
The computed length equals to the total width of the linear plus 10 %.
❗️ Note that the total is always rounded up, never down.
Pricing
Like every product, risers support different pricing 🔗 types: regular, reduced, membership, etc. Click the Pricing tab to define the price(s).
📌 The recommended pricing method for risers is 'linearMeter' or 'linearFeet'.
📌 For generic riser products, the pricing will use the price informations defined on mapped products.

The calculation and pricing of the riser in the planner is made as follows:
- Calculation of the computed width: the total linear length increased by 10%.
- Calculation of the number of riser units by dividing this total length by the
widthof the riser. - Multiplication of this number of units by the price of one riser product to get the final price.
📌 If there is more than on riser product in the mapping of the generic riser, we choose the smallest riser high enough to cover the current height of the riser. For example, if 3 risers are mapped with heights of 200mm, 300mm and 400mm, and if we need to price a 270mm height riser, the selected product will be the one that has a 300mm height, because it is the smallest available value that is equal, or greater than 270
Example
(linear length * 1.10) / riser width = number of units
number of units * price per unit = final price
(3400 mm * 1.10) = 3740
3740 / 2100 mm = 2 units
2 * 50€ = 100 €
Parameters to Add at Upper Level
Riser option is an indirect product feature. This means that it is not mandatory to list the riser products on the top cabinet level.
Deploying risers to the planner requires the following steps:
- Enable the riser option on the cabinet;
- Define a specific option for dedicated cabinets, if need be;
- Add the riser product to a catalog;
- Define the paths on the cabinet top-assembly ( See Define Riser Position 🔗).
Enable the Riser Option
The riserOption parameter on the cabinet will automatically launch a suggestion of available riser products in the
planner.
| Parameter | Type | Possible values | Default value |
|---|---|---|---|
riserOption | boolean | True / False | False |
Enable the Extension to the Sides
To allow the customer to enable or disable the extension of the riser on the left and/or right sides of the cabinet, two others parameters are needed on cabinet level:
- Define
leftCorniceBackwith 'true' as default value; - Define
rightCorniceBackwith 'true' as default value.
📌 Because these parameters do not impact the size and the position of the panel, only the set up on the cabinet level is needed. 📌 These parameters are also used by the cornices.
Catalog Update
To be available in an Application Distribution, it is mandatory to deploy all the riser products in the corresponding catalog 🔗.