Set Up Drainer Grooves
In the kitchen planner, depending on the worktop material it is possible to add drainer grooves on left, right or both sides of an underglued sink. Even if grooves are managed like any overloaded product, they are valid only on particular cases then it is important to manage the cases when grooves are available and also what reference is price.
This documentation describes one possible product structure and can differ on some cases, this proposal is following some asumptions:
- drainer grooves are only available for quartz and acrylic custom worktops;
- drainer grooves are only available when the sink is underglued;
- it is possible to choose the grooves position
- the priced reference product depends on the worktop material.
Based on these objectives, this documentation will follow three main principles :
- grooves are defined by a product with a BM3 representation compatible with byme worktop linear format;
- the activation of grooves option is managed by a boolean parameter;
- the relation between the worktop and grooves are managed by product rules.
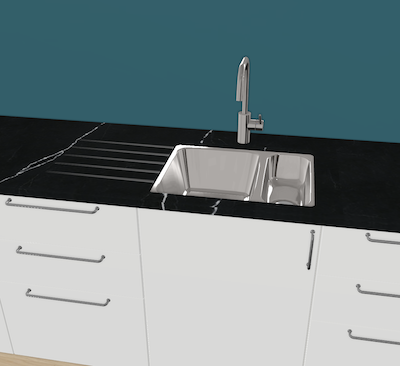
Illustration
On the illustration below, grooves are enabled.
Specify the Basic Information
The minimum information required to create a drainer grooves product is common to every kind of products.
Connect to 3DCloud and click Products on the CONTENT menu. Then, click New product.
This is:
- The name: The name will be displayed in the planner (in the Edit panel) and should be available for all languages. If not, the planner will display the name in the fallback language.
- Mandatory information: The product reference, the brand and the product type.
- Product information: This information is not mandatory but highly recommended, especially the short and long descriptions that are displayed in the planner.
- Product representation: This is where you specify among others the 3D resource, the thumbnail and the parameters.
- Pricing: This is where you specify the pricing type (regular, discount...).
Specify the 3D Resource and the Thumbnail
Note that for drainer grooves the 3D asset is a BM3. If you want to provide a 3D asset, it is recommended to use the attached BM3 based on a scalable texture which simulate the grooves on the byme worktop representation.
The .BM3 file will also contain the dimensions of the 3D asset.
Click Replace to browse for your .BM3 file and add it to the datasheet.
Click ![]() next to Thumbnail to specify the bitmap file that will be used as
thumbnail in 3DCloud and in the planner. Follow the format and size recommendations.
next to Thumbnail to specify the bitmap file that will be used as
thumbnail in 3DCloud and in the planner. Follow the format and size recommendations.
Since the drainer grooves is not really a 3D asset, it is also necessary to provide a .svg file to be used for 2D plan feature.
Click ![]() next to 2d model to specify the .svg file that will be used as picture in 2D plan. Follow the format and size
recommendations.
next to 2d model to specify the .svg file that will be used as picture in 2D plan. Follow the format and size
recommendations.
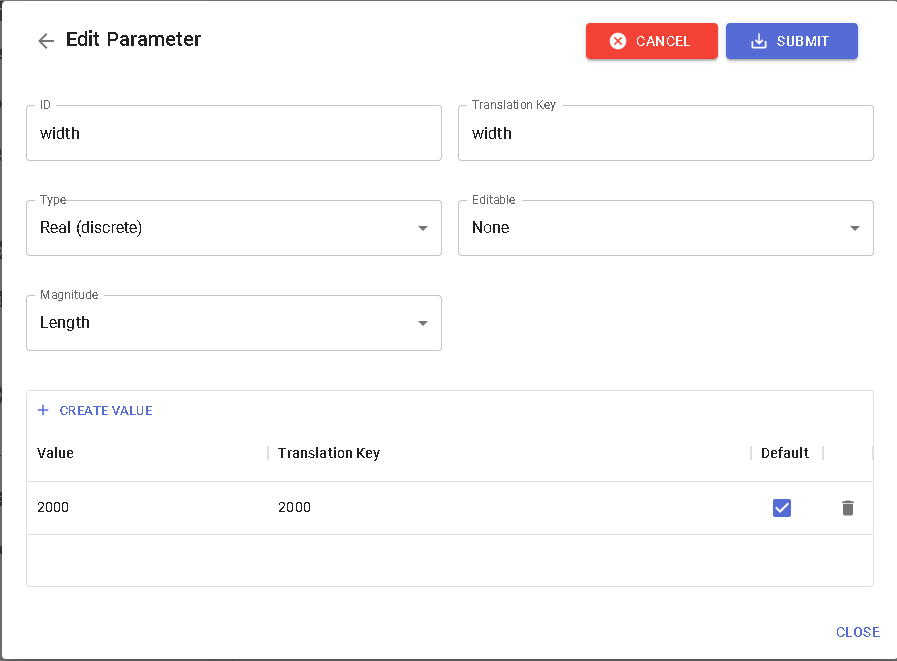
Specify the Dimension Parameters
| Parameter | Parameter type | Default value | Possible values |
|---|---|---|---|
width | Discrete length | – | [0 ;∞] |
depth | Discrete length | – | [0 ;∞] |
height | Discrete length | – | [0 ;∞] |
Pricing
Like every product, drainer grooves support different pricing 🔗 types: regular, reduced, membership, etc. on product mapped level (i.e. articles). Go to the Pricing panel to define the price(s).
Parameters to Add at Upper Level
| Parameter | Parameter type | Default value | Possible values |
|---|---|---|---|
drainerGrooves | Product parameter | – | productIds |
addDrainerGrooves | Boolean | FALSE | TRUE / FALSE |
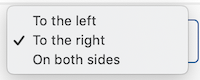
drainerGroovesPosition | Integer | 1 | 1,2,3 |
leftDrainerGroovesWidth | Discrete length | – | [0 ;∞] |
rightDrainerGroovesWidth | Discrete length | – | [0 ;∞] |
Like any other product of the product structure, drainer grooves are managed by a drainerGrooves product parameter on
the top assembly.
Then to activate the drainer grooves behavior on a dedicated sink cabinet, it is possible to define
a addDrainerGrooves boolean parameter on the top assembly and through all sub-assemblies.
❗️ These parameters are linked together by the usual activation method defined in the BMA where the grooves product is used as a component:
- Add both parameters into the BMA;
- Define the grooves component by adding the link to the product parameter;
- Define the grooves component activation by adding the link to the boolean parameter.
When done and when parameters are overloded from the top cabinet, it is possible to manually activate grooves via edit panel in the planner and check the result. At this step, grooves are manually usable but don't follow the availibility constraints.
The next parameter to manage is the drainerGroovesPosition integer parameter which manage three possible positions.
Then the last parameters are both left and right drainer grooves
width (leftDrainerGroovesWidth & rightDrainerGroovesWidth) which overload the size of the grooves on each sides.
Product rules definition
In order to define grooves availability, it is possible to define two product rules to manage addDrainerGrooves
and drainerGrooves separatly.
- A first chain rule can manage if grooves are usable or not depending on
sinkMounting(0 : topMounted; 1 : underglued) andworktopmaterial (defined by the worktop product ID) :
| sinkMounting | worktop | addDrainerGrooves |
|---|---|---|
0 | precut | FALSE |
0 | laminate | FALSE |
0 | solidwood | FALSE |
0 | quartz | FALSE |
0 | acrylic | FALSE |
1 | precut | FALSE |
1 | laminate | FALSE |
1 | solidwood | FALSE |
1 | quartz | FALSE / TRUE |
1 | acrylic | FALSE / TRUE |
... | ... | ... |
As a result the boolean addDrainerGrooves button will be unavailable when FALSE only :
 Or will be available when
 TRUE or FALSE :


- A second chain rule can manage grooves IDs depending on
worktopmaterial (defined by the worktop product ID) :
| worktop | addDrainerGrooves |
|---|---|
precut | null |
laminate | null |
solidwood | null |
quartz | quartzGroovesID |
acrylic | acrylicGroovesID |