Set Up Sinks and Taps
This section provides guidance to create, configure and assemble sinks and taps in cabinet.
In the kitchen planner, sinks are always associated to a tap.
❗️ There is a high dependency between sinks and taps and they are a strong link to various cabinet types. In addition, many applicative rules are triggered to check their position.
➡️ See CooktopSinkRule 🔗, SinkCabinetAndWindowRule 🔗, MinDistanceBetweenSinkAndHobCombinations 🔗
and MinDistanceTapHoleAndSink 🔗.
Definitions
| Term | Definition |
|---|---|
| Sink | Sinks are appliances placed on base cabinets, that require to define previously a specific cut-out on the worktop 🔗. They must convey to applicative rules to ensure the right distance around the sink, to the tab and with other appliances. |
| Bowls | The number of bowls and their orientation on the worktop can be defined via parameters. |
| Lid | XXXXX |
| Drainer | The drainer can be placed either on the right or the left side of the bowl(s). |
| Tap | Tap are appliances mapped with sinks. They require a specific cut-out either on the sink or on the worktop. They must convey to applicative rules that checks their position and the size of the cut-out. |
| Tap pipe | Each tap must be connected to a pipe. The center of the tap and the center of the pipe must be aligned by defining offset parameters. |
| Sink and tap offset | Whatever the tap is placed in or outside the sink, its position must be defined precisely by using specific offset parameters. |
| Sink mounting | Sinks can have three positions on the worktop: ▪️ Top-mounted: The sink is mounted on the worktop and partially covers the cut-out; ▪️ Under-mounted: The sink is mounted under the worktop is the cut-out partially covers the sink (see worktop cut-out operations 🔗 for detailed information); ▪️ Moulded: The sink is mounted under the worktop and an edge product is added. |
Illustrations
Below are illustrations of concepts regarding plinths that are documented hereinafter.
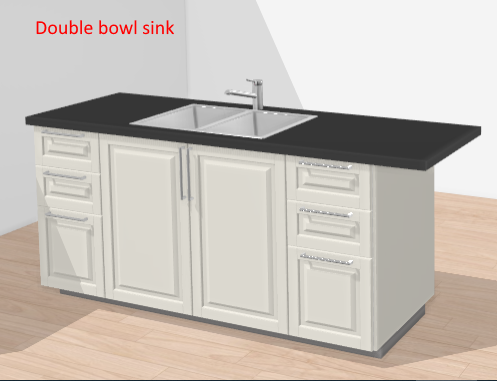
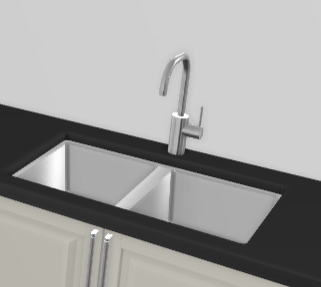
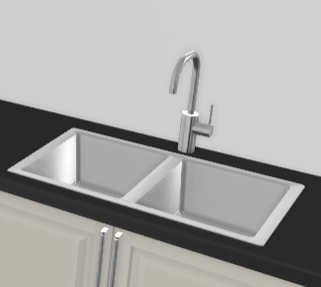
Cabinet with double bowl sink
The base cabinet has a double bowl sink that is top-mounted. The tap is outside the sink, between the two bowls.
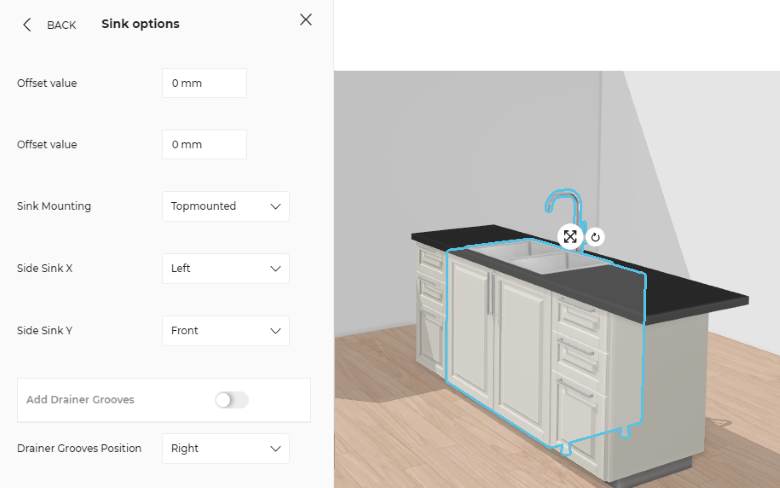
Sink and tap options
The cabinet editor allows to choose between many options, including the sink mounting, the position of the tap and the offsets.
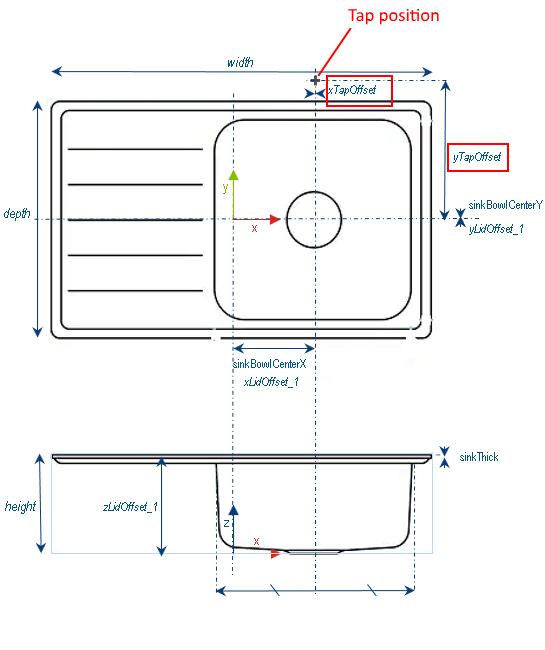
Tap size and offset
Let us consider the following tap:
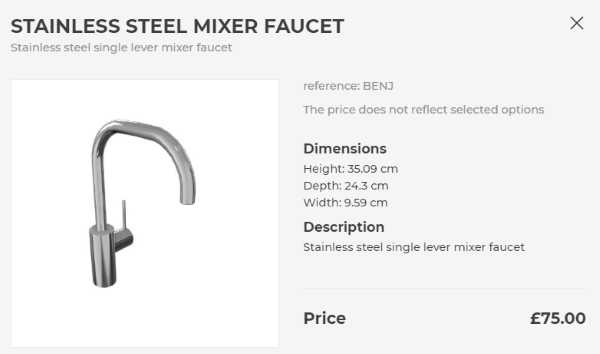
Dimensions, offset and diameter of the cut-out are used to position the tap.
Sink and Tap products
The minimum information required to create a tap or a sink is common to every kind of products.
This is:
- The name: The name will be displayed in the planner (in the Edit panel) and should be available for all languages. If not, the planner will display the name in the fallback language.
- Mandatory information: The product reference, the brand and the product type.
- Product information: This information is not mandatory but highly recommended, especially the short and long descriptions that are displayed in the planner.
- Product representation: This is where you specify among others the 3D resource, the thumbnail and the parameters.
- Pricing: This is where you specify the pricing type (regular, discount...).
❗️ Select your product type carefully because it will trigger the applicative rules:
- For sinks, select the type "Sinks"
- For taps, select the type "Faucets".
Specify the 3D Resource and the Thumbnail
A sink (or a tap) is defined by a 3D asset managed in Geometry Editor. The required resource is a .BM3 file compliant with the ByMe platform requirements and containing among others the dimensions of the 3D asset.
The resource can also be a .BMA file: either a sink (or a tap) assembly or a sink and tap assembly.
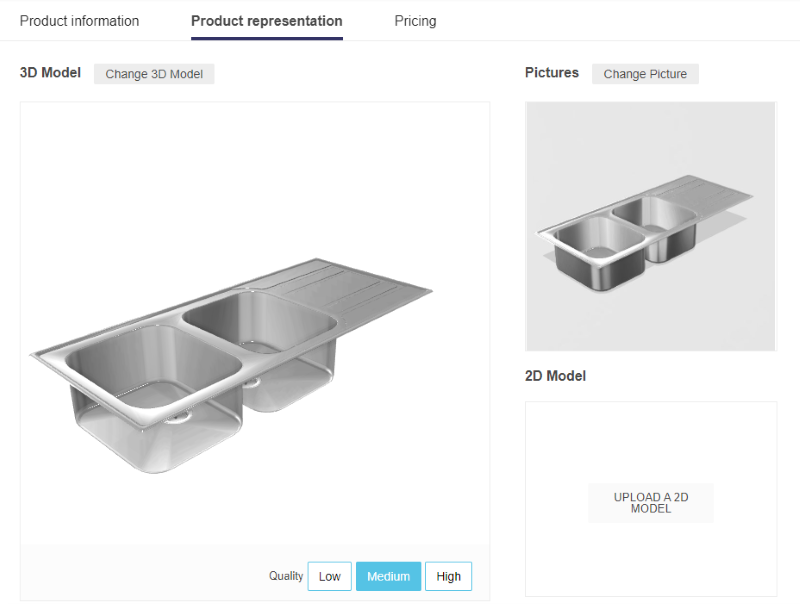
Click Upload a picture to specify the bitmap file that will be used as thumbnail in 3DCloud and in the planner. Follow the format and size recommendations.
Specify the Dimension Parameters
❗️ Although the dimensions of the asset are embedded in the .BM3 file they must be specify in 3DCloud. These parameters will be recovered in Assembly Editor and are mandatory.
Click Add variable dimension in the Product representation tab to define the width, the depth and the height of the sink (or tap).
Dimensions for a Sink Product
| Parameter | Parameter type | Default value | Possible values |
|---|---|---|---|
width | Discrete length | – | [0 ;∞] |
depth | Discrete length | – | [0 ;∞] |
height | Discrete length | – | [0 ;∞] |
Dimensions for a Tap Product
| Parameter | Parameter type | Default value | Possible values |
|---|---|---|---|
width | Discrete length | – | [0 ;∞] |
depth | Discrete length | – | [0 ;∞] |
height | Discrete length | – | [0 ;∞] |
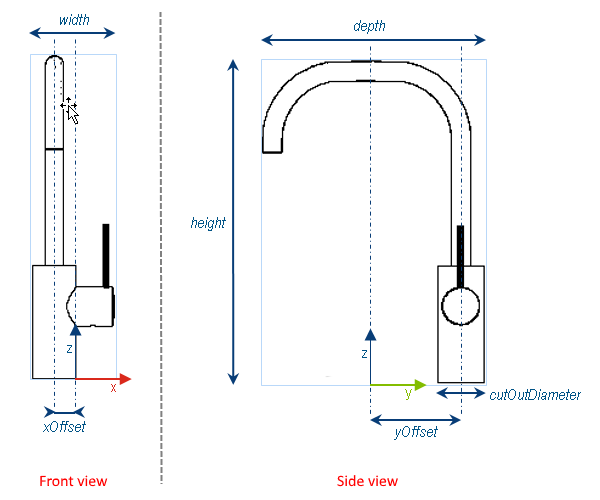
Other Dimensions for Tap Products
➡️ See the illustration of a tap above.
Click Add variable dimension in the Product representation tab to define the following parameters
| Parameter | Parameter type | Default value | Possible values | Function |
|---|---|---|---|---|
xOffset | Discrete length | – | [-∞; ∞] | Defines the distance between the origin of the BM3 (i.e. the center of the bounding box) and the center of the tap pipe on the X-axis. |
yOffset | Discrete length | – | [-∞; ∞] | Defines the distance between the origin of the BM3 (i.e. the center of the bounding box) and the center of the tap pipe on the Y-axis. |
cutOutDiameter | Discrete length | – | [0 ;∞] | Defines the diameter of the cut-out on the worktop. |
Sink Assembly
The sink and tap assembly structure influence the behaviors of the sink and tap within the cabinet. The structure below
is a recommendation that manage properly sink and tap products and their cutout operations that have to be transmitted
to worktop manufacturer.
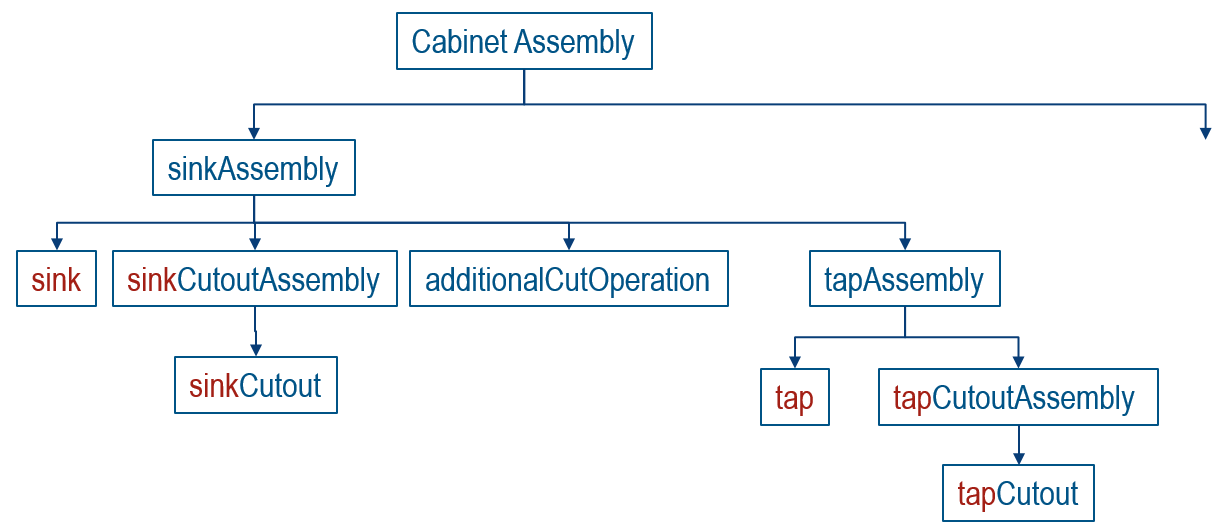 Fig.1 : Sample of sink assembly structure.
Cabinet Assembly is the top assembly of the cabinet. It is a product (the cabinet) with a BMA file (the
assembly).
sinkAssembly is the assembly (product and BMA) that manage the sink, the tap their cutouts and sink options in the
context of a cabinet.
sink is the sink product with a geometry (BM3). This product manage the visualisation of the sink in 3D. It can be a
product with a price or a generic product referencing multiple articles.
sinkCutoutAssembly is the product that create the cutout of the sink in the worktop. Its BMA defines the profile of
the cutout. This profile is take into to generate the cutout in the worktop.
sinkCutout is the product that represent the cutout operation. It can be a product with a price or a generic product
referencing multiple cutout articles. It should be the case if the cost of the cutout depends on the worktop
material.
additionalCutOperation is a product that manage an additional operation related to the sink for special mounting
configuration. For instance a cut or an underglued operation.
tapAssembly is the assembly (product and BMA) that manage the tap and cutout associated to sink. Notice that the
tapAssembly is part of the sinkAssembly, this structure ensure that the tap is moved with the sink if the sink position
is adjusted.
tap is the tap product with a geometry (BM3). This product manage the visualisation of the tap in 3D. Usually it is
a product with a price.
tapCutoutAssembly is the product that create the cutout of the tap in the worktop. Its BMA defines the profile of
the cutout, usually for tap it is a circular profile. This profile is take into account to generate the cutout in the
worktop.
tapCutout is the product that represent the drilling operation that generate the circular cutout of the tap. It can
be a product with a price or a generic product referencing multiple cutout articles.
The sinkAssembly, sink, sinkCutoutAssembly and sinkCutout assembly structure constitute a pattern that will be read
through to extract the information needed to create order for the worktop manufacturer.
See Wortop Export Information.
The sinkCutoutAssembly is the starting point as it generates the cutout in the worktop. It has to be referenced by the
sinkAssembly with a parameter named sinkCutoutAssembly. The part of the parameter name before CutoutAssembly
is sink, this is how is identified the component managed by this structure.
▪ sinkAssembly must reference the sink product with a parameter named sink.
▪ sinkAssembly must reference the additionalCutOperation with a parameter named additionalCutOperation.
▪ sinkCutoutAssembly must reference the sinkCutout product with a parameter named sinkCutout.
Those conventions are used to fullfill
in Worktop Export Information - Sink Object,
the
field dbID , sinkCutoutID and additionalOperationID with the proper products references of the sink.
A similar pattern is used for the tap. The tapCutoutAssembly has to be referenced by the tapAssembly with a parameter
named tapCutoutAssembly The part of the parameter name before CutoutAssembly is tap.
▪ tapAssembly must reference the tap product with a parameter named tap.
▪ tapCutoutAssembly must reference the tapCutout product with a parameter named tapCutout.
Those conventions are used to fullfill
in Worktop Export Information - Other object
the
field dbID , CutoutID with the proper products references of the tap.
A similar pattern has to be used for the hob and its cutout.
Parameters for a Sink Assembly
📌 The parameters below must be defined on assembly level. A sink assembly is made at least of one or two bowls and a drainer.
Define the Options
Create a New product and add the .BMA of the sink assembly as 3D resource. Then, click Add option to define the following parameters.
| Parameter | Parameter type | Default value | Possible values | Function |
|---|---|---|---|---|
numberOfBowls | Discrete variation | 2 | 1/2 | Defines the number of bowls that the sink has. This parameter impacts the number of lids. |
sinkBowlCenterX | Discrete variation | – | [-∞; ∞] | Defines the position of the bowls on the X-axis. If the value of numberOfBowls is 2 then the X position is centered between the two bowls. |
sinkBowlCenterY | Discrete variation | – | [-∞; ∞] | Defines the position of the bowls on the X-axis. If the value of numberOfBowls is 2 then the Y position is centered between the two bowls. |
drainerGroovesPosition | Discrete variation | 1 | 1/2/3 | Defines the orientation of the drainer groves, either: ▪️ 1 Grooves are left oriented ▪️ 2 Grooves are right oriented ▪️ 3 Grooves have no predefined orientation. |
Define the Products
Click Add product replacement to define the products that are compatible with the assembly.
| Parameter | Parameter type | Default value | Possible Vvlues | Function |
|---|---|---|---|---|
sink | Product parameter | external dbID | external dbID | xxx |
sinkPlug | Product parameter | external dbID | external dbID | xxx |
drainerGrooves | Product parameter | external dbID | external dbID | xxx |
Sink and Tap Assembly
The offset parameters defined in 3DCloud for the sink and tap assembly must match those defined for the .BMA in Assembly Editor.
Click Add variable dimension to specify the offset parameters.
Offset for Sink Products
| Parameter | Parameter type | Default value | Possible values | Function |
|---|---|---|---|---|
xTapOffset | Discrete length | – | [-∞;∞] | Defines the position of the tap on the X-axis. This length is mandatory even if the tap is outside the sink. |
yTapOffset | Discrete length | – | [-∞;∞] | Defines the position of the tap on the Y-axis. This length is mandatory even if the tap is outside the sink. |
zTapOffset | Discrete length | – | [-∞;∞] | Defines the position of the tap on the Z-axis. This length is mandatory even if the tap is outside the sink. |
Offset for Tap Products
See above the offset parameters for tap products. They must be defined on the sink and tap sub-assembly too.
Pricing
Like every product, sinks and taps support different pricing 🔗 types: regular, reduced, membership, etc. on product mapped level. Go to the Pricing panel to define the price(s).
Parameters to Add at Upper Level
The following parameter is used to define the position of the sink into a cabinet.
Example of an under-mounted sink
Example of a top-mounted sink
| Parameter | Parameter type | Default value | Possible values | Function |
|---|---|---|---|---|
sinkThick | real | – | [-∞;∞] | Defines the size of the visible part of the sink on the top of the worktop. |
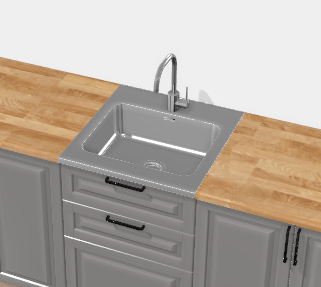
Parameters to Add for a Full Depth Sink
Example of a full depth sink
| Parameter | Parameter type | Status | Default value | Possible values | Function |
|---|---|---|---|---|---|
isFullDepth | bool | Optional | – | true/false | Must be true if the sink is full depth. false if not defined |
fullDepthCutWidth | real | Optional | – | [0;∞] | Defines the width on which there is no worktop. If not defined, the width of the sink is used instead |
fullDepthThicknessCompatibility | real | Optional | – | [0;∞] | Defines the list (or range) of the compatible worktop thickness on the left and right of the sink. Used only in the FullDepthSinkThickness rule 🔗 |
❗️ A full depth sink removes the worktop on the cabinet. The value of the
worktopThickparameter on the cabinet is set to 0 in this case. Refer to