Set Up Fillers
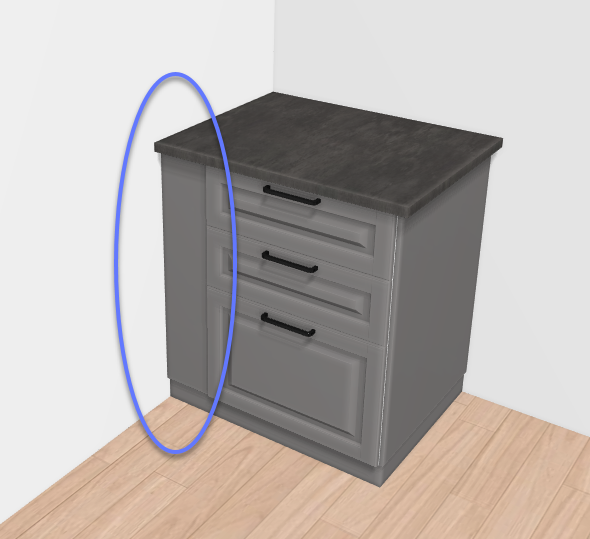
Fillers are vertical or horizontal strips used to fill in empty spaces, when there is no possibility to add a cabinet which size were compatible with the gap. This empty space can be either between a cabinet and the wall, or a cabinet and the ceiling or even between two cabinets. Fillers can be added manually by the customer to the kitchen plan as freeestanding parametric products, or automatically by the kitchen planner according to a rule. They can have different shapes and colors.
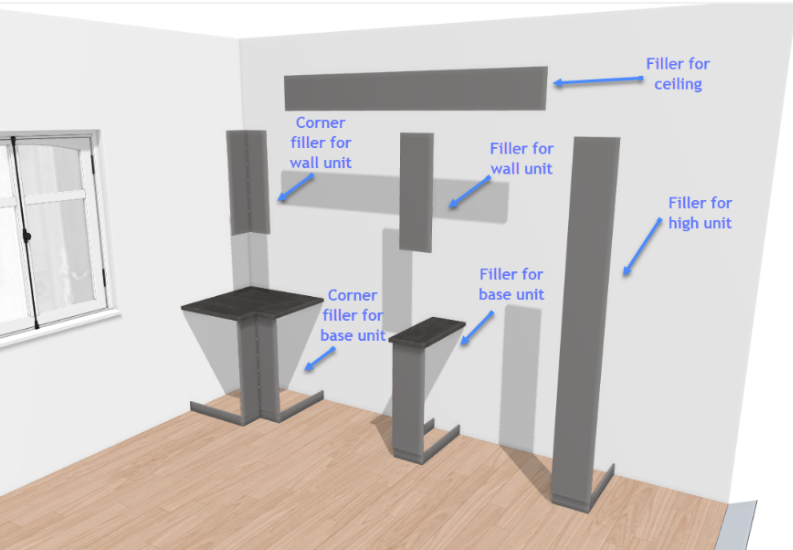
The following filler products can be added to a catalog:
- Filler for base cabinets
- Filler for wall cabinets
- Filler for high cabinets
- Filler for ceilings
- Corner filler for base cabinets
- Corner filler for wall cabinets
➡️️ Click here 🔗 to open the complete sample to define fillers through API.
Illustrations
Below are illustrations of concepts regarding cover panels that are documented hereinafter.
Filler between a cabinet and the wall
Possible filler products
Specify the Basic Information
The minimum information required to create a filler is common to every kind of products.
This is:
- The name: The name will be displayed in the planner (in the Edit panel) and should be available for all languages. If not, the planner will display the name in the fallback language.
- Mandatory information: The product reference, the brand and the product type.
- Product information: This information is not mandatory but highly recommended, especially the short and long descriptions that are displayed in the planner.
- Product representation: This is where you specify among others the 3D resource, the thumbnail and the parameters.
- Pricing: This is where you specify the pricing type (regular, discount...).
❗️ To be recognized by the planner as a filler strip, the corresponding products should be set with the "Filler strip angle" for corner fillers and "Free standing filler strip" the others. Note that automatic fillers are based on the usage of free standing fillers that are automatically set up on correct dimensions.

Specify the 3D Resource and the Thumbnail
The required resource for each type of filler is a .BMA file whose two main components are the front piece and the transparent box. The filler will be considered as a "normal" cabinet with its bounding box, which will provide a correct snapping with other cabinets.
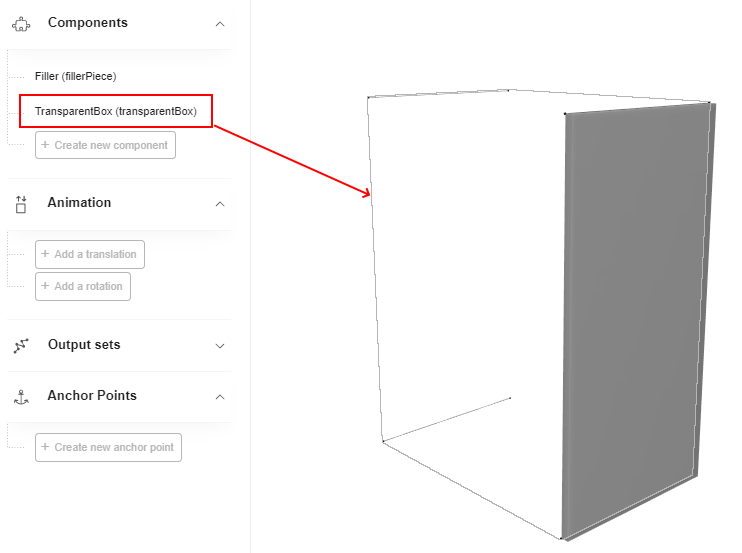
📌 The front filler piece is built on the basis of a priced product, usually the back cover panel.
- Click Upload a 3D model to browse for your .BMA file and add it to the datasheet.
- Click Upload a picture to specify the bitmap file that will be used as thumbnail in 3DCloud and in the planner. Follow the format and size recommendations.
Specify the Dimension Parameters
❗️
widthis a strictly mandatory parameter used for price calculation.
Base Unit Filler
| Parameter | Type | Possible values | Default value |
|---|---|---|---|
width | Continuous length | [25;600] | 100 |
depth | Discrete length | 370 600 | 600 |
height | Discrete length | 800 | 800 |
legHeight | Continuous length | [0 ;∞] | 80 |
High Unit Filler
| Parameter | Type | Possible values | Default value |
|---|---|---|---|
width | Continuous length | [25;600] | 100 |
depth | Discrete length | 600 | 600 |
height | Discrete length | 2000 2200 | 2200 |
legHeight | Continuous length | [0 ;∞] | 80 |
Wall Unit Filler
| Parameter | Type | Possible values | Default value |
|---|---|---|---|
width | Continuous length | [25;600] | 100 |
depth | Discrete length | 370 600 | 370 |
height | Discrete length | 400 600 800 1000 | 800 |
Ceiling Filler
| Parameter | Type | Possible values | Default value |
|---|---|---|---|
width | Continuous length | [25;∞] | 1000 |
depth | Discrete length | 370 600 | 370 |
height | Continuous length | [10 ; ∞] | 50 |
Corner Base Unit Filler
| Parameter | Type | Possible values | Default value |
|---|---|---|---|
width | Discrete length | 100 | 100 |
depth | Discrete length | 600 | 600 |
height | Discrete length | 800 | 800 |
angle | Continuous length | [5;175] | 145 |
legHeight | Discrete length | [0 ; ∞] | 80 |
leftDepth | Discrete length | 370 600 | 600 |
rightDepth | Discrete length | 370 600 | 600 |
leftWidth | Continuous length | [25;200] | 200 |
rightWidth | Continuous length | [25;200] | 200 |
Corner Wall Unit Filler
| Parameter | Type | Possible values | Default value |
|---|---|---|---|
width | Discrete length | 100 | 100 |
depth | Discrete length | 370 | 370 |
height | Discrete length | 400 600 800 1000 | 800 |
angle | Continuous length | [5;175] | 145 |
leftDepth | Discrete length | 370 600 | 370 |
rightDepth | Discrete length | 370 600 | 370 |
leftWidth | Continuous length | [25;200] | 200 |
rightWidth | Continuous length | [25;200] | 200 |
Proceeding
📌 width, depth and height are the only prelisted parameters.
Continuous width for a base filler
Discrete height for a corner wall filler
Define the Option Parameters
The parameters below link to the different types of fillers.
Options for Base Unit Fillers
| Parameter | Type | Default value | Description |
|---|---|---|---|
isAuto | true/false | false | Defines whether the filler will be added automatically or not. |
plinthOption | true/false | true | Defines whether the filler transparent box can support a plinth or not. |
worktopOption | true/false | true | Defines whether the filler transparent box can support a worktop or not. |
wallEdgeStripOption | true/false | false | Defines whether the filler transparent box can support a wall edge strip or not. |
wallPanelOption | true/false | false | Defines whether the filler transparent box can support a wall panel or not. |
allowWallPanelAutoCompletion | true/false | true | If wallPanelOption is set to 'true', defines whether the wall panel will be auto-completed or not. |
Options for Corner Base Unit Fillers
| Parameter | Type | Default value | Description |
|---|---|---|---|
isAuto | true/false | false | Defines whether the filler will be placed automatically or not. |
plinthOption | true/false | true | Defines whether the transparent box can support a plinth or not. |
worktopOption | true/false | true | Defines whether the transparent box can support a worktop or not. |
wallEdgeStripOption | true/false | false | Defines whether the transparent box can support a wall edge strip or not. |
wallPanelOption | true/false | false | Defines whether the transparent box can support a wall panel or not. |
allowWallPanelAutoCompletion | true/false | true | If wallPanelOption is set to 'true', defines whether the wall panel will be auto-completed or not. |
Options for High Unit Fillers
| Parameter | Type | Default value | Description |
|---|---|---|---|
isAuto | true/false | false | Defines whether the filler will be placed automatically or not. |
plinthOption | true/false | true | Defines whether the transparent box can support a plinth or not. |
corniceOption | true/false | false | Defines whether the transparent box can support a cornice or not. |
riserOption | true/false | false | Defines whether the transparent box can support a riser or not. |
leftCorniceBack | true/false | true | If corniceOption is set to 'true', enables the customer to activate cornice/riser return to the wall on the left side of the cabinet. |
rightCorniceBack | true/false | true | If corniceOption is set to 'true', enables the customer to activate cornice/riser return to the wall on the right side of the cabinet. |
Options for Wall Unit Fillers
| Parameter | Type | Default value | Description |
|---|---|---|---|
isAuto | true/false | false | Defines whether the filler will be placed automatically or not. |
corniceOption | true/false | false | Defines whether the transparent box can support a cornice or not. |
riserOption | true/false | false | Defines whether the transparent box can support a riser or not. |
leftCorniceBack | true/false | true | If corniceOption is set to 'true', enables the customer to activate cornice/riser return to the wall on the left side of the cabinet. |
rightCorniceBack | true/false | true | If corniceOption is set to 'true', enables the customer to activate cornice/riser return to the wall on the right side of the cabinet. |
decoStripOption | true/false | false | Defines whether the transparent box can support a decoration strip or not. |
leftDecoStripBack | true/false | false | If decoStripOption is set to 'true', enables the customer to activate deco strip return to the wall on the left side of the cabinet. |
rightDecoStripBack | true/false | false | If decoStripOption is set to 'true', enables the customer to activate deco strip return to the wall on the right side of the cabinet. |
sectionOrientation | 0 1 | 1 | Enables the customer to choose the orientation of the deco strip. This orientation can change the size of the adjacent side panels if activated (requires decoStripOption [product]. 0-horizontal 1-vertical) |
Options for Corner Wall Unit Fillers
| Parameter | Type | Default value | Description |
|---|---|---|---|
isAuto | true/false | false | Defines whether the filler will be placed automatically or not. |
corniceOption | true/false | false | Defines whether the transparent box can support a cornice or not. |
riserOption | true/false | false | Defines whether the transparent box can support a riser or not. |
leftCorniceBack | true/false | true | If corniceOption is set to 'true', enables the customer to activate cornice/riser return to the wall on the left side of the cabinet. |
rightCorniceBack | true/false | true | If corniceOption is set to 'true', enables the customer to activate cornice/riser return to the wall on the right side of the cabinet. |
decoStripOption | true/false | false | Defines whether the transparent box can support a decoration strip or not. |
leftDecoStripBack | true/false | false | If decoStripOption is set to 'true', enables the customer to activate deco strip return to the wall on the left side of the cabinet. |
rightDecoStripBack | true/false | false | If decoStripOption is set to 'true', enables the customer to activate deco strip return to the wall on the right side of the cabinet. |
sectionOrientation | 0 1 | 1 | Enables the customer to choose the orientation of the deco strip. This orientation can change the size of the adjacent side panels if activated (requires decoStripOption [product]. 0-horizontal 1-vertical) |
Options for Ceiling Unit Fillers
| Parameter | Type | Default value | Description |
|---|---|---|---|
isAuto | true/false | false | Defines whether the filler will be placed automatically or not. |
Define the Filler Piece Product
The filler piece parameter defines a list of compatible products to use as a front for the specific filler strip. Tis parameter is generally linked to the list of back cover panels. These back cover panels should be existing products available on the current catalog of the Legal Entity.
| Parameter | Type | Possible value | Default value |
|---|---|---|---|
fillerPiece | Product variation | External dbID | External dbID |
Pricing
Like every product, fillers support different pricing 🔗 types: regular, reduced, membership, etc.
Actually, pricing a filler product is made by pricing related elements i.e. it relates to the map pricing of the back cover panel and its dimensions.
Deploy Free Standing Fillers
As a single product that the customer can add manually, free standing fillers can be deployed only by:
- Defining the correct product type "Free standing filler strips";
- Select the read and write editable option for the parameters;
- Adding the filler products (and their priced products) to a catalog 🔗 in order to make them available for the application distribution.
Deploy Automatic Fillers
Based on free standing products already deployed in a catalog, it is possible to activate automatic filler generation by
defining an autoFillerOption boolean parameter on the top level of the cabinet.
It is also necessary to set up the default values of the filler applicative rule.
Define the autoFillerOption Parameter
The autoFillerOption parameter must be defined at the cabinet level with 'true' as default value.
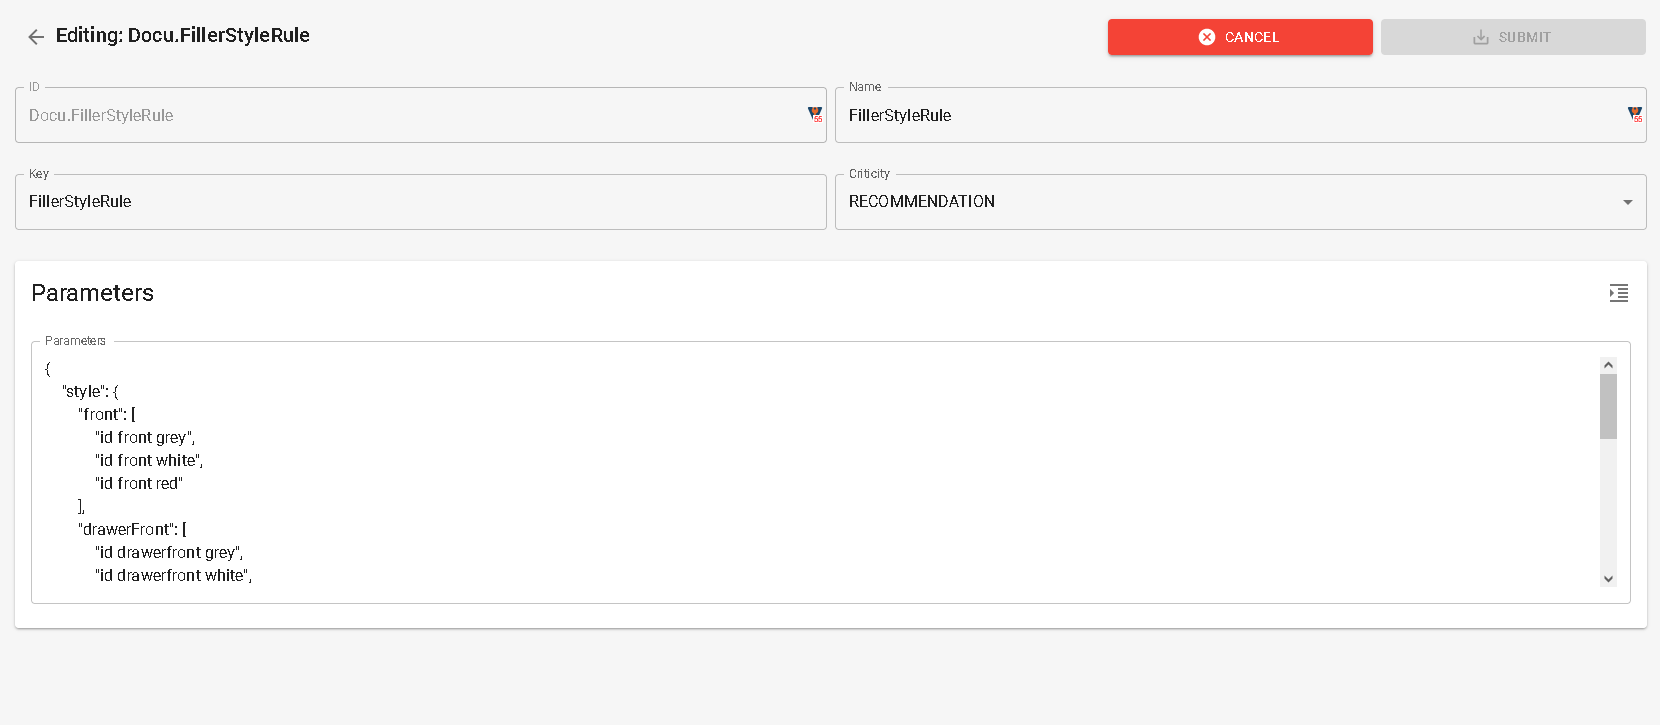
Set Up the Applicative Rule
To define which default product to automatically use as a filler piece on a cabinet, it is necessary to indicates each values in the "FillerStyleRule" 🔗. Specify each product by adding its ID to the list of parameters.
Example of filler rule content:
{
    "style": {
        "front": [
            "id front grey",
            "id front white",
            "id front red"
        ],
        "drawerFront": [
            "id drawerfront grey",
            "id drawerfront white",
            "id drawerfront red"
        ],
        "fillerPiece": [
            "corresponding fillerPiece id grey",
            "corresponding fillerPiece id white",
            "corresponding fillerPiece id red"
        ]
    },
    "defaultBaseFiller": "14103",
    "defaultHighFiller": "14104",
    "defaultWallFiller": "14107",
    "defaultHalfHeightFiller": "14106",
    "minWidth": 25,
    "maxWidth": 400,
    "defaultWidth": 50
}
Click Applicative rules in the CONTENT menu of 3DCloud to create the rule. Name it "FillerStyleRule" and select Recommandation as criticity level. Then, specify the products as illustrated below: