Step 3 – Set Up Products
➡️️ For detailed information on the 3DCloud user interface, see the 3DCloud 🔗 documentation.
The next step consists in creating in 3DCloud one datasheet per model (.BM3 file). Once the datasheet is created, the model becomes a product.
Each datasheet will define the name of the product and the descriptions to display in the Kitchen Planner (both in various languages); link the model to a type and a brand; define its period of availability and its pricing; define various tags to reference it; contain a 2D and a 3D representation if need be; contain size parameters and options if need be.
❗ This step is mandatory to make the products available in Assembly Editor, including the articles that have not been edited in Geometry Editor, such as the legs.
Create Product Datasheets
To create a product datasheet, cf product page:
🚧 For our sample cabinet, you have to create datasheets for each product (box, door front, handle, shelf and the legs). As best practice, do not create any material datasheet, because materials should have been applied in the .BM3 3D model.
About the Language
The possible languages are defined in the application distribution. The languages available for the name field and the Commercial information drop-down list depend on these settings.
About the Product Types
Selecting a product type is mandatory because it will trigger the applicative rules.
If you hesitate between several similar types, use the type that describes the destination of your product. For example: if you have a choice between several types of doors, do not use "doors" but specify that the door is the front of the cabinet and select "front doors".
About Descriptions
Although the description fields are not mandatory, they are highly recommended.
The commercial description and the short description will be displayed to the customer in the product page of the Kitchen Planner.
You can write as many words as wished in the Commercial description area. If the text exceed the text area, a scroll bar will appear.
However, the number of words is limited in the Short description text area. A best practice is to limit the short description to five words (keep in mind that description will be translated).
About Tags
Tags are not mandatory for Kitchen, because they are not used as filters in the Kitchen Planner. However, you can specify that your product is intended for the "kitchen" room.
About Parameter and IDs
You will have to define parameters in the datasheets and give them an ID.
They make the link between the 3D representation (the .BMA file) and the product containing this 3D representation. The mapping is done by creating parameters using the same name (case sensitive) in 3DCloud and in Assembly Editor.
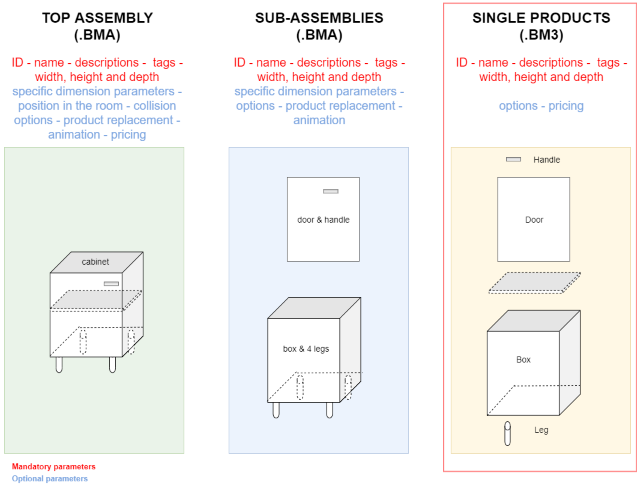
Parameters are defined at three levels:
- At "simple product level", when products do not belong to an assembly yet.
- At "sub-assembly level", when the product are combined in a sub-assembly.
- At "top-assembly level", when products and sub-assemblies are grouped together into a final assembly.
❗ The size parameters (width, depth, height) are mandatory at each level.
Simple Product Level Parameters
You will define size parameters for all the products, referring to the dimensions of the 3D model.
Select dimension variations to define the fixed or variable width, height and depth for each product.
Additionally, you have to define 'type' options for the fronts and handles.
🚧 For our sample cabinet, you will define at this step the parameters of the first level, that is to say the dimensions of the box, the door front, the handles, the shelf and the legs. In addition, the options of the door front and the handles.
Sub-Assembly Parameters
It is a best practice to create product combinations, such as "door front and handle" and "box and legs". These combinations are named sub-assemblies.
➡️ See Step 5 – Datamodel 🔗 for detailed information.
These sub-assemblies require specific parameters (i.e. options) to define their behavior.
Top-Assembly Parameters
Once all the products and sub-assemblies are grouped together into a single product in Assembly Editor, the result is named "top-assembly" and must have its own product datasheet with new parameters.
Among these parameters, you will define options to enable the worktop in the Kitchen Planner.
Writing Parameter IDs
Below are some rules and recommendations regarding these IDs.
- IDs are case sensitive.
- Respect the camel case convention: capitalize the first letter of the second and following words. E.g. backLegP
- Never use these characters:
\*, \, /, @, &, {, }, [, ], %, £, $. - Never use vowels with accents or umlauts.
- Use generic words.
- To ensure that the desired behavior will happen, the parameter needs to have the same ID as the BM3 material publication or BMA material parameter. The same for the width, depth, height parameters of the BM3.
- In some cases, they should match expected parameter IDs in the application (e.g. worktopOption) as defined in the Parameter Dictionary.
About Pricing
Pricing depends on your catalog. For some catalogs, the pricing is specified for each single product, and so the price of the cabinet is the sum of each products, for others it is defined at the top-assembly level for each combination of the cabinet. In your case, you have to choose.
🚧 For our sample cabinet, we will define the pricing at the top-assembly level. Leave these fields blank during this step.
Datasheet Information Overview
Below is an overview of the information that should be specified, depending on the level.
📌 Current Step 3 only deals with single products. Else, see Step 5 🔗 and Step 6 🔗.
Create the Box Datasheet
To create the datasheet for the box, follow the steps illustrated below.
General Information
- Enter the name of the product: select a language in the drop-down list and then, enter a name. Repeat this step for each language. Note that this name will be displayed to the customer.
- Enter your reference for the product. This reference may be displayed to the customer and is used in Assembly Editor as well.
- Link the product to a product type, i.e. Boxes because it is a box.
- Link the product to your Brand.
Product Information
- Define the period of availability, if need be. Note that these dates always overwrite the dates set in the catalog.
- Choose a language to use in the Kitchen Planner.
- Enter the commercial description and a short description of the box.
Product Representation
The Product Representation panel is essential when creating the datasheet, because:
- It is where you upload the model, i.e. the .BM3 file;
- It is where you set up variations, options and mapping parameters.
3D and 2D Representations
- Add the BM3 file by clicking Replace.
- Add a bitmap picture of the box by clicking
 next to thumbnail. It will be
used as thumbnail in the product list in
3DCloud and in the Kitchen Planner.
next to thumbnail. It will be
used as thumbnail in the product list in
3DCloud and in the Kitchen Planner.
Technical Information
Not applicable.
Parameters
We have defined a smart scaling on our box to enable its widening in the Kitchen Planner. Thus, specify the dimensions by clicking create parameter.
width example: (depth and height will follow the same pattern )
- Fill the id with width.
- Enter a translation key that will be later filled with the according translations.
- Select Real Discrete in the Type list. This will allow the customer to choose between different possible values, while the Real Continuous would allow the customer to enter a value between two limits.
- Select the magnitude e.g. the physic dimension that represent this parameter here it is a length.
- Enter the possible values in the corresponding fields, with a name to display to the customer. For our box, enter * 600* and 800.
- select the default value.
- Click Submit to save the parameter locally.
Repeat the proceeding to specify the height and the depth of the box.
Submit
Click Submit to upload the model and its datasheet in the 3DCloud storage. Click Products to see the new product in the list.
When the product is successfully added (a delay is possible), the 3D model column displays Yes in the product list.
Create the Door Front Datasheet
To create the datasheet for the door front, follow the steps illustrated below.
General Information
- Enter the name of the product: select a language in the drop-down list and then, enter a name. Repeat this step for each language. Note that this name will be displayed to the customer.
- Enter your reference for the product. This reference may be displayed to the customer and is used in Assembly Editor as well.
- Link the product to a product type, i.e. Front doors because it is a front for the door of the future base cabinet.
- Link the product to your Brand.
Product Information
- Define the period of availability, if need be. Note that these dates always overwrite the dates set in the catalog.
- Choose a language to use in the Kitchen Planner.
- Enter the commercial description and a short description of the door.
- Define tags to ease the classification of the door in the Kitchen Planner.
Product Representation
Start by adding the 3D and 2D representations of the product.
- Add the .BM3 file by clicking Replace.
- Add a bitmap picture of the door by clicking next to thumbnail. It will be used as thumbnail in the product list
in 3DCloud and in the Kitchen Planner.
Parameters
We defined a smart scaling on our door to enable its widening in the Kitchen Planner. Thus, specify the dimensions by clicking Create parameter.
width example: (depth and height will follow the same pattern )
- Fill the id with width.
- Enter a translation key that will be later filled with the according translations.
- Select Real Discrete in the Type list. This will allow the customer to choose between different possible values, while the Real Continuous would allow the customer to enter a value between two limits.
- Select the magnitude e.g. the physic dimension that represent this parameter here it is a length.
- Enter the possible values in the corresponding fields, with a name to display to the customer. For our box, enter * 600* and 800.
- select the default value.
- Click Submit to save the parameter locally.
Repeat the proceeding to specify the height and the depth of the box.
Submit
Click Sumbit to upload the model and its datasheet in the 3DCloud storage. Click Products to see the new product in the list.
When the product is successfully added (a delay is possible), the 3D model column displays Yes in the product list.
Create the Knob Datasheet
To create the datasheet for the knob, follow the steps illustrated below.
General Information
- Enter the name of the product: select a language in the drop-down list and then, enter a name. Repeat this step for each language. Note that this name will be displayed to the customer.
- Enter your reference for the product. This reference may be displayed to the customer and is used in Assembly Editor as well.
- Link the product to a product type, i.e. Handles because a knob is a type of handle.
- Link the product to your Brand.
Product Information
- Define the period of availability, if need be. Note that these dates always overwrite the dates set in the catalog.
- Choose a language to use in the Kitchen Planner.
- Enter the commercial description and a short description of the knob.
- Define tags to ease the classification of the knob in the Kitchen Planner.
Product Representation
Start by adding the 3D and 2D representations of the product.
- Add the BM3 file.
- Add a bitmap picture of the knob. It will be used as thumbnail in the product list in 3DCloud and in the Kitchen Planner.
Type Option
These variation parameters will complete the publication made in Geometry Editor.
➡️️ See Appendix 2 🔗 for the list of possible parameters for a base cabinet.
Handles can be of three different types:
- Type 1: A classic handle, to fix on the front door
- Type 2: An edge handle, to fix on the edge of the door
- Type 3: A drop handle
This type parameter is mandatory, unless you will not be able to place the knob on the door front.
Click Create parameter.
- Fill id field with type.
- Fill the translation key.
- Select Integer (discrete) in the Type list. This will allow you to enter a value.
- Enter 1 as unique possible value.
- select the default value, i.e. 1.
- Click submit.
Fixed Dimensions
Define the dimensions of the handle by clicking create parameter. This variation is used for any dimension specification, even if it will not vary.
width example: (depth and height will follow the same pattern )
- Fill the id with width.
- Enter a translation key that will be later filled with the according translations.
- Select Real Discrete in the Type list. This will allow the customer to choose between different possible values, while the Real Continuous would allow the customer to enter a value between two limits.
- Select the magnitude e.g. the physic dimension that represent this parameter here it is a length.
- Enter the possible values in the corresponding fields, with a name to display to the customer.
- select the default value.
- Click Submit to save the parameter locally.
Repeat the proceeding to specify the height and the depth of the box.
Material Replacement
❗ You will define a material replacement in the datasheet only if it has not been defined in the BM3 model itself in Geometry Editor and on condition that the other material has a material datasheet.
As a best practice, we duplicated the knob in two models after a material publication in Geometry Editor. That is why a material replacement is not required in 3DCloud.
Product Replacement
To allow the customer to choose between our three possible handles (two versions of the knob and the metal handle), we will define a product replacement in the datasheet "front and handle" sub-assembly.
Submit
Click Submit to upload the model and its datasheet in the 3DCloud storage. Click Products to see the new product in the list.
When the product is successfully added (a delay is possible), the 3D model column displays Yes in the product list.
Create the Shelf Datasheet
To create the datasheet for the shelf, follow the steps illustrated below.
General Information
- Enter the name of the product: select a language in the drop-down list and then, enter a name. Repeat this step for each language. Note that this name will be displayed to the customer.
- Enter your reference for the product. This reference may be displayed to the customer and is used in Assembly Editor as well.
- Link the product to a product type, i.e. Cabinet shelves because this shelf belongs to a cabinet.
- Link the product to your Brand.
Product Information
- Define the period of availability, if need be. Note that these dates always overwrite the dates set in the catalog.
- Choose a language to use in the Kitchen Planner.
- Enter the commercial description and a short description of the box.
- Define tags to ease the classification of the box in the Kitchen Planner.
Product Representation
Start by adding the 3D and 2D representations of the product.
- Add the BM3 file.
- Add a bitmap picture of the box. It will be used as thumbnail in the product list in 3DCloud and in the Kitchen Planner.
Parameter
We defined a smart scaling on our shelf to enable its widening in the Kitchen Planner. Thus, specify the dimensions by clicking Create parameter.
width example: (depth and height will follow the same pattern )
- Fill the id with width.
- Enter a translation key that will be later filled with the according translations.
- Select Real Discrete in the Type list. This will allow the customer to choose between different possible values, while the Real Continuous would allow the customer to enter a value between two limits.
- Select the magnitude e.g. the physic dimension that represent this parameter here it is a length.
- Enter the possible values in the corresponding fields, with a name to display to the customer.
- select the default value.
- Click Submit to save the parameter locally.
Repeat the proceeding to specify the height and the depth of the box.
Submit
Click Submit to upload the model and its datasheet in the 3DCloud storage. Click Products to see the new product in the list.
When the product is successfully added, the 3D model column displays Yes in the product list.
Create the Leg Datasheet
To create the datasheet for the leg, follow the steps illustrated below.
General Information
- Enter the name of the product: select a language in the drop-down list and then, enter a name. Repeat this step for each language. Note that this name will be displayed to the customer.
- Enter your reference for the product. This reference may be displayed to the customer and is used in Assembly Editor as well.
- Link the product to a product type.
- Link the product to your Brand.
Product Information
- Define the period of availability, if need be. Note that these dates always overwrite the dates set in the catalog.
- Choose a language to use in the Kitchen Planner.
- Enter the commercial description and a short description of the leg.
Product Representation
- Add the BM3 file.
- Add a bitmap picture of the leg. It will be used as thumbnail in the product list in 3DCloud and in the Kitchen Planner.
Parameter
Click Create Parameter to allow the customer change the height of the leg in the Kitchen Planner.
width example: (depth and height will follow the same pattern )
- Fill the id with width.
- Enter a translation key that will be later filled with the according translations.
- Select Real Discrete in the Type list. This will allow the customer to choose between different possible values, while the Real Continuous would allow the customer to enter a value between two limits.
- Select the magnitude e.g. the physic dimension that represent this parameter here it is a length.
- Enter the possible values in the corresponding fields, with a name to display to the customer.
- select the default value.
- Click Submit to save the parameter locally.
Repeat the proceeding to specify the height and the depth of the box.
Submit
Click Submit to upload the model and its datasheet in the 3DCloud storage. Click Products to see the new product in the list.
When the product is successfully added (a delay is possible), the 3D model column displays Yes in the product list.
Create the Worktop Product Material Datasheet
The worktop is a material (a .BM3MAT file) and needs to be recorded in a product datasheet.
The proceeding is the same to the creation of products only the category of the product should be Material.
Create the Worktop Datasheet
Worktops are generated dynamically in the Kitchen Planner from the worktop products available in the database, and from the settings made in 3DCloud and Assembly.
At this stage, you have to create several worktop products to create a choice of worktops for the customer.
➡️️ See Step 5 / Prepare the Worktop 🔗 and Step 6 / Worktop Option and Worktop Type 🔗 for detailed information about the worktop settings.
General Information
- Enter the name of the product: select a language in the drop-down list and then, enter a name. Repeat this step for each language. Note that this name will be displayed to the customer.
- Enter your reference for the product. This reference may be displayed to the customer and is used in Assembly Editor as well.
- Link the product to a product type, i.e. Worktops because it is a worktop.
- Link the product to your Brand.
Product Information
- Define the period of availability, if need be. Note that these dates always overwrite the dates set in the catalog.
- Choose a language to use in the Kitchen Planner.
- Enter the commercial description and a short description of the worktop.
Product Representation
- Add the BM3MAT file.
- Add a bitmap picture of the worktop. It will be used as thumbnail in the product list in 3DCloud and in the Kitchen Planner.
Parameter
Click Create parameter to define the depth of the worktop. Our worktop is a precut one, and only the width of our sample worktop is stretchable to be consistent with the stretching of the cabinet.
width example: (depth and height will follow the same pattern )
- Fill the id with width.
- Enter a translation key that will be later filled with the according translations.
- Select Real (continuous) in the Type list. This will allow the customer to choose between different possible values, while the Real Continuous would allow the customer to enter a value between two limits.
- Select the magnitude e.g. the physic dimension that represent this parameter here it is a length.
- Enter the possible values in the corresponding fields, with a name to display to the customer.
- select the default value.
- Click Submit to save the parameter locally.
Repeat the proceeding to specify the height and the depth of the box.
worktopType
This option will determine whether the worktop is sold with predefined dimensions ("precut"), or at the meter ("custom").
- Fill the id with worktopType.
- Select the Read and write in the editable field to make the worktop editable by the customer in the Kitchen Planner.
- Enter a translation key that will be later filled with the according translations.
- Select string in the Type list. This will allow the customer to choose between different possible values.
- Enter precut as unique possible value and select it as default.
- Click Submit to save the parameter locally.
Pricing
Worktops require a pricing mapping, which is not defined in this datasheet.
➡️️ See Set Up the Pricing 🔗 for detailed information about the pricing.
Submit
Click Submit to upload the model and its datasheet in the 3DCloud storage. Click Products to see the new product in the list.
When the product is successfully added (a delay is possible), the 3D model column displays Yes in the product list.