Set Up Handles
The purpose of this page is to explain how to set up the handle position management with 3DCloud.
Handles are not displayed as such to the customer in the kitchen planner, they are always part of a door/handle or drawer/handle sub-assembly. The handle product is at the lowest level in the tree that goes up to the full cabinet. The settings for handles depend on the number of sub-assemblies building the final product and the complexity of the .BMA files 🔗.
This page will deal with the most frequent handle positions.
➡️ Click here 🔗 to open the complete sample to define handles through API.
Definitions
The table below lists all the definitions around handles.
| Term | Definition |
|---|---|
| Handles | Can be added on each front (door front or drawer front) of cabinets. Handles can have: ▪️ Various colors and shapes (defined in 3D asset) ▪️ Various positions ▪️ Various orientations |
| Handle type | Parameter that impact the position of the handle on the front. |
| Handle vertical position | Parameter used to define whether the handle is place on the top, the middle or the bottom of the front. |
| Handle layout | Parameter used to define the position of the handle on the front: either centered or on a side. To define which side, the "side" parameter is required. |
| Handle side | Parameter used to define whether the handle is on the left or on the right side of the cabinet. |
| Handle orientation | Parameter used to define if the handle is horizontally or vertically oriented. |
Specify the Basic Information
The minimum information required to create an handle is common to every kind of products.
This is:
- The name: The name will be displayed in the planner (in the Edit panel) and should be available for all languages. If not, the planner will display the name in the fallback language.
- Mandatory information: The product reference, the brand and the product type.
- Product information: This information is not mandatory but highly recommended, especially the short and long descriptions that are displayed in the planner.
- Product representation: This is where you specify among others the 3D resource, the thumbnail and the parameters.
❗️ Select your product type carefully: Handles.
Specify the 3D Resource and the Thumbnail
An handle is defined by a 3D asset managed in Geometry Editor. The required resource is a .BM3 file compliant with the ByMe platform requirements.
The .BM3 file contains among others, the dimensions of the 3D asset and a smart scaling if one has been defined in Geometry Editor to enable product resizing in the planner.
📌 The best practice would be to not scale handles. If you want to have different sizes for the same handles, duplicate it in as many products (BM3 files) as there are sizes.

Click ![]() next to thumbnail to specify the bitmap file that will be used as
thumbnail in 3DCloud and in the planner. Follow the format and size recommendations.
next to thumbnail to specify the bitmap file that will be used as
thumbnail in 3DCloud and in the planner. Follow the format and size recommendations.
Specify the Dimension Parameters
Although the dimensions of the asset are embedded in the .BM3 file they must be specify in 3DCloud. These parameters will be recovered in Assembly Editor and are mandatory.
| Parameter | Type | Possible values |
|---|---|---|
depth | Discrete length | [0 ;∞] |
width | Discrete length | [0 ;∞] |
height | Discrete length | [0 ;∞] |
Click create parameter in the Parameter panel to define the width, the depth and the height of the handle.

Specify the Option Parameters
The option parameters are not strictly mandatory, but they are required to ensure the behavior of the front in the assembly.
The type Parameter
type is one of the most important parameters for handles because it defines their behavior on the front of the
cabinet.
| Parameter | Type | Possible values | Default value |
|---|---|---|---|
| type | Discrete variation | [1;2;3] | 1 |

Handle Types
There are three types of handles, as illustrated below.
| Type value | Type name | Illustration |
|---|---|---|
| 1 | classic front position |  |
| 2 | edge position |  |
| 3 | drop position |  |
Pricing
Like every product, handles support different pricing 🔗 types: regular, reduced, membership, etc. Go to the Pricing panel to define the price(s).
📌 The recommended pricing method for handles is 'packAmount'.

Parameters to Add at Upper Levels
Deploying handles requires to set three additional parameters named side, handleLayout and handleOrientation on
the handle and front assemblies.
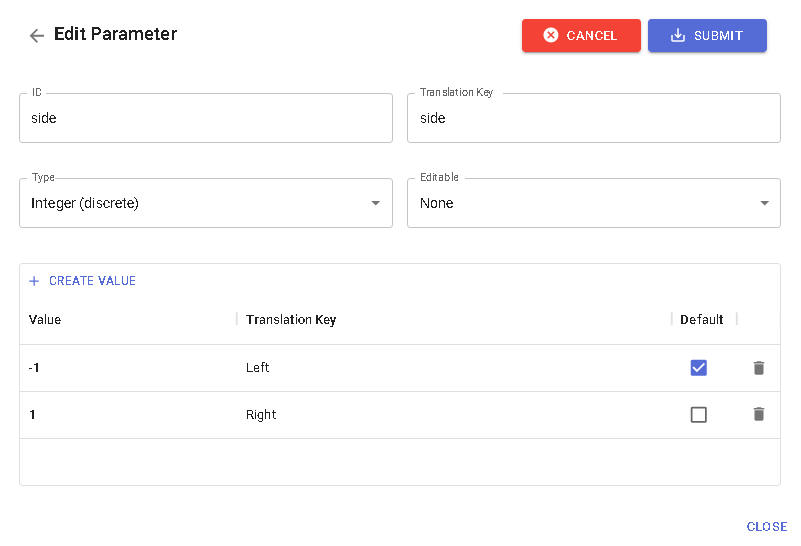
The side Parameter
Set the side parameter on the front-handle sub-assembly and on the cabinet top-assembly to enable the customer to
change the door opening side of the cabinet and the position of the handle on the door front at the same time.
| Parameter | Type | Possible values | Default value |
|---|---|---|---|
side | Discrete variation | -1 (Left) and 1(Right) | -1 |
The handleLayout Parameter
Set the handleLayout parameter on the cabinet top-assembly to enable the customer to force centered handle position
instead of right and left position managed by the side parameter.
| Parameter | Type | Possible values | Default value |
|---|---|---|---|
handleLayout | Discrete variation | 0 / 1 | 1 |
The values are:
- 0 = Force the position to centered
- 1 = Keep the position defined by the side parameter
The handleOrientation Parameter
| Parameter | Type | Possible values | Default value |
|---|---|---|---|
handleOrientation | Discrete variation | 0 / 1 | 1 |
If handleLayout is set to 1 you can also define the handleOrientation parameter on the cabinet top-assembly to
enable the customer to change the orientation of the handle.
The values are:
- 1 = Vertical
- 0 = Horizontal
The handleVerticaPosition Parameter
| Parameter | Type | Possible values | Default value |
|---|---|---|---|
handleVerticalPosition | Discrete variation | [0;1;2] | 1 |
Defines whether the vertical handle is placed on the bottom, the middle or the top of the door front. The possible values are:
- 0 = Bottom
- 1 = Middle
- 2 = Top