Set Up Decorative Legs
It is possible to replace the two legs placed on the front of the cabinet by decorative legs.
❗️ Decorative legs are incompatible with plinths (plinths are therefore disabled) and are available only if the cabinet is attached to a wall.
To manage decorative legs, the kitchen planner can be set up with a dedicated applicative rule named DecoLegConsistencyRule 🔗 for the following use cases:
- The customer chooses a decorative leg product in the Edit panel. In this case the regular plinth is removed and the regular legs are replaced by the decorative ones.
- The customer chooses a decorative leg product on a compatible cabinet but this cabinet is not attached to the wall. In this case, a warning is displayed in the Help Center and the forbidden configuration is highlighted.
- The customer chooses a decorative leg product on a compatible cabinet but this cabinet is part of an incompatible linear. In this case, a warning is displayed in the Help Center and the forbidden configuration is highlighted.
❗️ Even if there is no dependency with the plinth 🔗 or decorative plinths 🔗 of the cabinet, decorative legs strongly linkt to these options.
➡️️ Click here 🔗 to open the complete sample to define decorative legs through API.
Definitions
| Term | Definition |
|---|---|
| Leg | Every cabinet on the floor has (and must have) legs, i.e. base cabinets, corner cabinets and high cabinets. These legs define the position of the cabinet from the floor. They can have different shapes and size and are represented and priced by a dedicated product in the catalog. |
| Decorative leg | Decorative legs are particular legs that have a different shape compared to regular legs. |
| Decorative leg assembly | The leg assembly is a product based on a .BMA file that defines the settings, relations and position of the decorative legs on a box. This information is mandatory to implement the decorative leg behavior. This assembly can be reused with any concerned cabinet and conversely, many assemblies with different behaviors can be created for a same cabinet. |
| Decorative leg applicative rule | Even if the default number and the default position of decorative legs are defined in the assembly, the planner can be upgraded with an applicative rule to manage the behavior of these legs. |
➡️️ See the two applicative rules for decorative legs: FurnitureDecoLegRule 🔗 and DecoLegConsistencyRule 🔗 for detailed information.
Illustrations
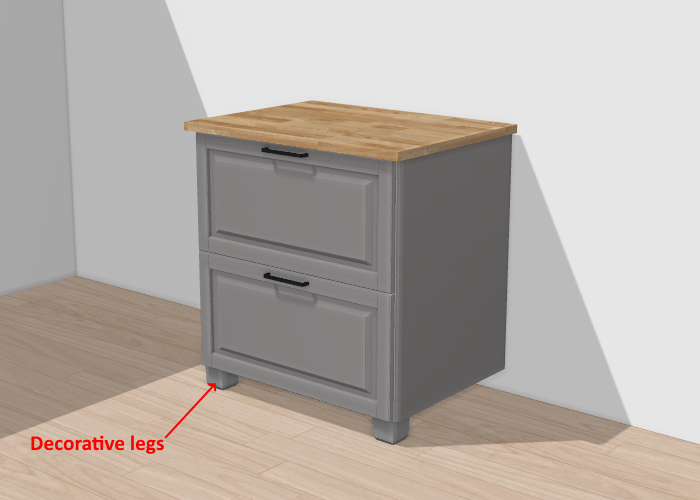
Below is an illustration of decorative legs.
The base cabinet is attached to the wall via a suspension rail. The regular legs on the front have been replaced with decorative legs and the two legs of the back have been removed. Due to the decorative legs, plinths are disabled.
Specify the Basic Information
The minimum information required to create a decorative leg is common to every kind of products.
This is:
- The name: The name will be displayed in the planner (in the Edit panel) and should be available for all languages. If not, the planner will display the name in the fallback language.
- Mandatory information: The product reference, the brand and the product type.
- Product information: This information is not mandatory but highly recommended, especially the short and long descriptions that are displayed in the planner.
- Product representation: This is where you specify among others the 3D resource, the thumbnail and the parameters.
- Pricing: This is where you specify the pricing type (regular, discount...).
❗️ Select your product type carefully because it will trigger the applicative rules: the type is "Legs" (even if decorative).
Specify the 3D Resource and the Thumbnail
A decorative leg is defined by a 3D asset managed in Geometry Editor. The required resource is a .BM3 file compliant with the ByMe platform requirements.
The .BM3 file contains among others, the dimensions of the 3D asset and a smart scaling if one has been defined in Geometry Editor 🔗 to enable product resizing in the planner.
Click ![]() to specify the bitmap file that will be used as thumbnail in 3DCloud and in the planner.
Follow the format and size recommendations.
to specify the bitmap file that will be used as thumbnail in 3DCloud and in the planner.
Follow the format and size recommendations.
Specify the Dimension Parameters
❗️ Although the dimensions of the asset are embedded in the .BM3 file they must be specify in 3DCloud. These parameters will be recovered in Assembly Editor and are mandatory.
Click Add variable dimension in the Product representation tab to define the width, the depth and the height of the leg.
| Parameter | Parameter type | Default value | Possible values |
|---|---|---|---|
width | Discrete length | – | [0;∞] |
depth | Discrete length | – | [0;∞] |
height | Discrete length | – | [0;∞] |
Pricing
Like every product, decorative legs support different pricing 🔗 types: regular, reduced, membership, etc.
Parameters to Add at Upper Level
Decorative legs are 3D assets that must have a product datasheet as such just to be added as component to a leg-box assembly.
Setting up decorative legs in therefore a four-step process:
- Specify the basic information, 3D resource (BM3) and dimensions of the decorative leg in a product datasheet.
- Add the leg as component of an assembly and define its parameters and relations.
- Create a new product datasheet for the leg assembly and add it to the catalog.
- Create a product rule to switch dynamically from regular to decorative legs.
About the Assembly
Compared to a regular leg assembly, the decorative leg assembly has a simplest definition due to a different applicative behavior: no shared products between cabinets, same position as the regular legs that the decorative replace, etc. Therefore, to avoid managing overly complex assemblies when it is not necessary, it is recommended to create specific assemblies dedicated to decorative legs with the prupose of simply manage two legs products on the front of the cabinet.
➡️️ See Position decorative legs 🔗 for detailed information on this assembly.
Assembly Parameters
No mandatory parameter is needed on decorative leg assembly level.
However, to avoid impacting the parameter overload chain from cabinet product, it is recommended to use the same parameter names as for regular legs to define the parametric decorative leg component in the assembly.
Product Rule
The usage of a dedicated assembly for two legs needs to switch the assembly dynamically in the planner when the customer chooses a decorative leg. To achieve that it is advised to set a product rule of type "Chain" that will define the leg assembly to use for each leg.
- Click Product rules in the left menu and then Add rule.
- Enter a name for the rule: e.g. leg / legAssembly (for decor legs).
- Choose Chain in the Type drop-down list.
- Submit.
- Click Parameter to specify the parameters that will be involved by the rule: a. Enter leg with the type product. b. Enter legAssembly with the type product.
- Click Submit.
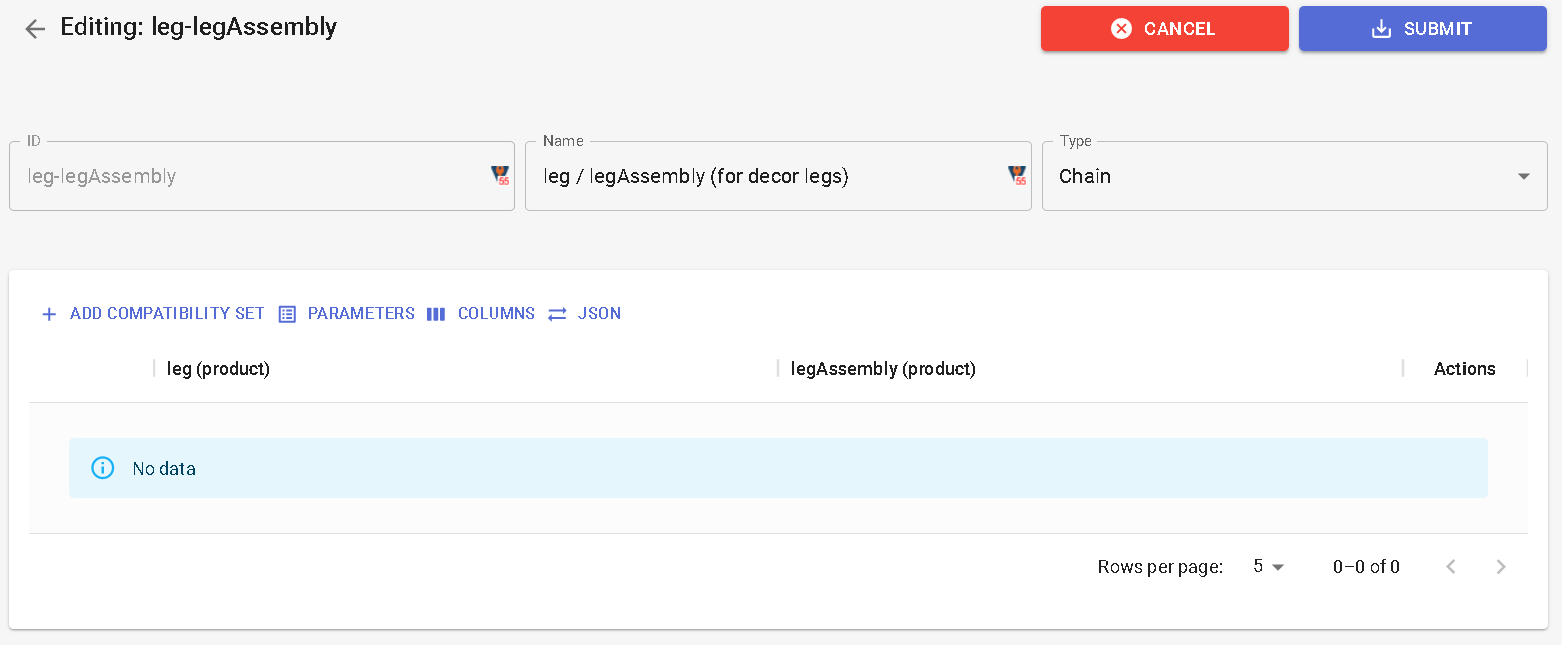
Now set the compatibility set.
📌 The parameters are now the column headers.
- Click Add compatibility set to enter data in the table.
- Click + in the leg column to search for the legs concerned by the switch.
- Click + in the legAssembly column to search for the decorative legs that could replace the regular leg.
- Click Submit.
📌 Add as many lines as products that are concerned by the rule by clicking New rule.